⚠ Note: Gemini generated the code for this month's Hints. If something seems awry, check the Hints (PDF) or Solutions (PDF).
Tap on any hint box to view it.
LOCATION – Major Arcana
- Did you notice what is spelled out by the first letter of each line?
- Each card features multiple images that point toward a single letter, primarily using NATO terms.
- The first card features a man shouting and the sound waves bouncing around. What NATO letter might go with that – and also go with “Easter Egg”?
- PARTIAL SOLUTION: The first row: Empress → E; Wheel of Fortune → E; High Priestess → F; Magician → I;
- PARTIAL SOLUTION: The second row: Heirophant → J; Fool → L; Hermit → N; Lovers → O;
- PARTIAL SOLUTION: The final row: Strength → R; Emperor → S; Chariot → U; Justice → Y;
- If you have all the letters, you need to order them. Keep in mind that the first card is 0 - Fool.
- LIFE’S JOURNEY
Pentacles
- Marigold was always well organised, giving her wish list clues so that their corresponding items would be in alphabetical order.
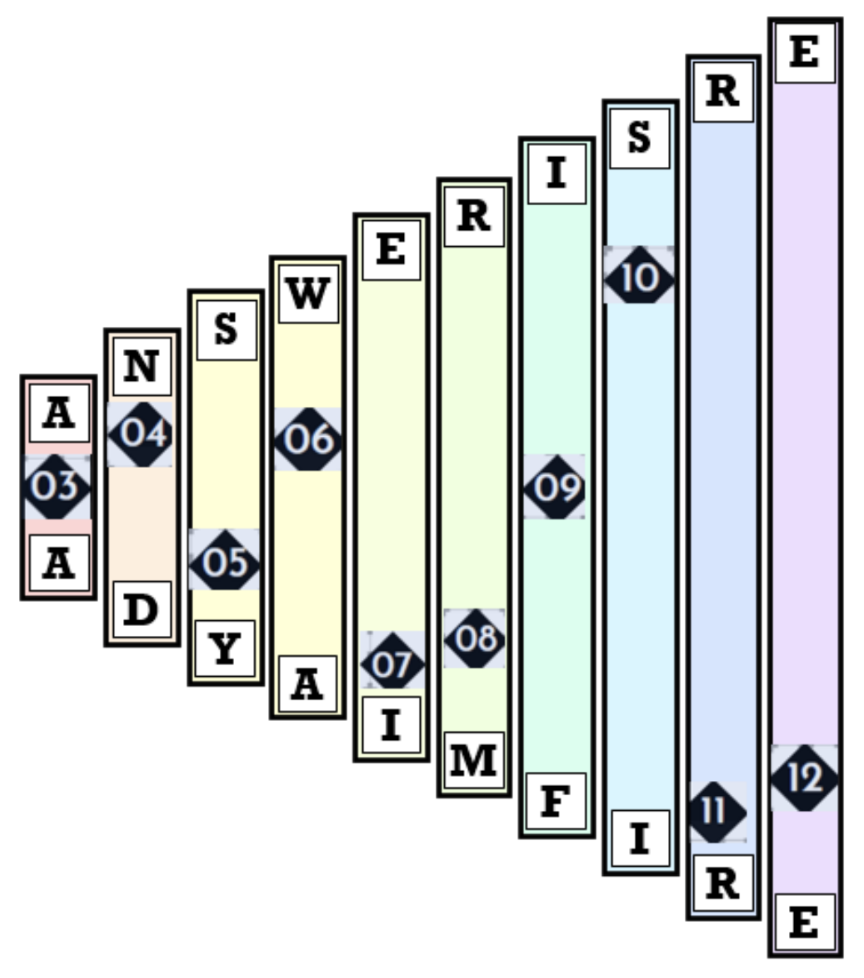
- Marigold's choice to note down words and numbers means this puzzle can be solved through a combination of both language and maths. If you are struggling to make words, try figuring out what letters could fit in each row based on the sums.
- Perhaps a demonstration is in order. "Observe" if you will, that the fifth row, has a value of 5. It cannot be made with five I's, there are only four I’s in the Pentacle coin bank on the left. So it must be solved with a single V. Were it place upon the second E, the row would now spell "OBSERVANT": Eagle-eyed, attentive.
- Another? The row beneath OBSERVANT has a sum of 60, an X and an L. Placed correctly this spells "XYLOPHONE": Bars beaten musically.
- PARTIAL SOLUTION: The wish list revealed: A biological building block -> AMINOACID; Transmission type sans stick -> AUTOMATIC; An ink or bullet box -> CARTRIDGE; A colour-changer -> CHAMELEON; An outgoing individual -> EXTROVERT; Six-sided -> HEXAGONAL; Eagle-eyed, attentive -> OBSERVANT; Defeat disproportionately -> OVERWHELM; Contradictory conundrums -> PARADOXES; Bars beaten musically -> XYLOPHONE
- PARTIAL SOLUTION: The finished grid:
CARTRIDGE
EXTROVERT
OVERWHELM
AUTOMATIC
OBSERVANT
XYLOPHONE
AMINOACID
CHAMELEON
HEXAGONAL
PARADOXES
- After filling in the grid, all that's left to do is *uncover* the truth, coin-by-coin. Like, literally, in the order of the coins value.
- After placing all the coins, they can be removed in order starting with the I-coins and removing left to right top to bottom, then V-coins, X-coins, etc.
- THUS SHE BECAME A MATERIAL GIRL
Wands
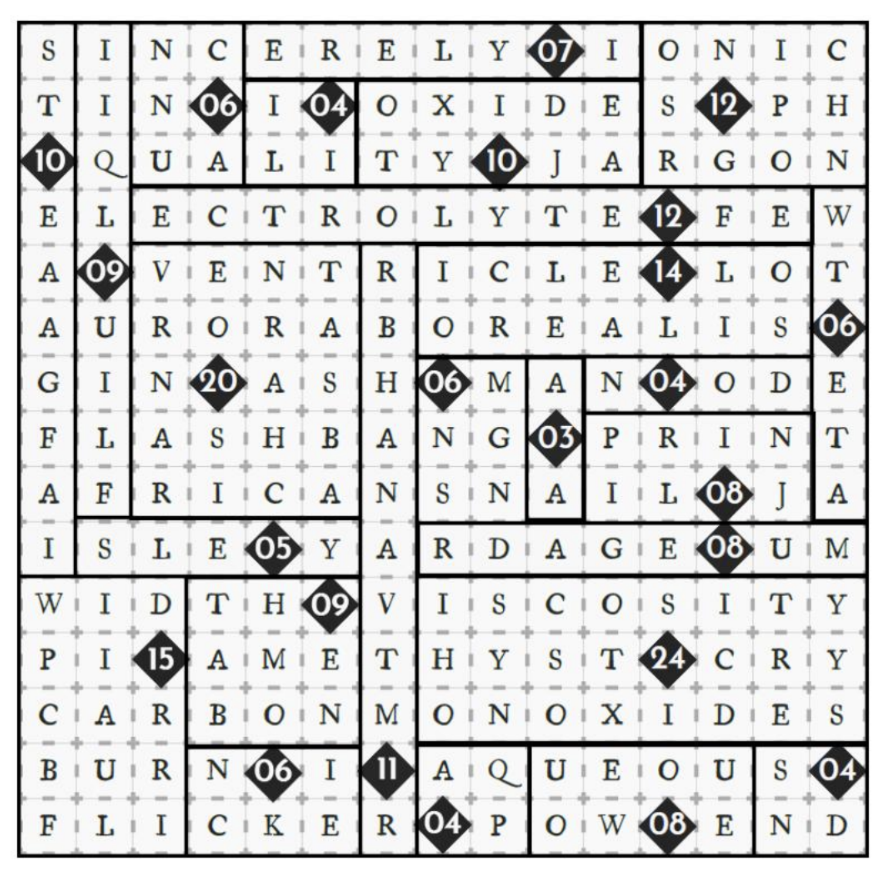
- The layout of this luggage is a logic puzzle known as a Shikaku or Rectangles puzzle. There is only one way to solve this that works properly. It's often easiest to get a foothold with a large number.
- Take the 10 on the left side. It’s the only one that can cover the square in the upper left corner, and so there is only one way it can be positioned. What other numbers are like that?
- Take the 15 in the bottom left. It could only fit 1x15 or 3x5. But only one will cover all the spaces in the bottom left corner.
- The 11 near the bottom and the 24 have fairly constrained options for where they can fit.
- PARTIAL SOLUTION: This is what the completed grid looks like: https://puzzledhint.com/JUN2026fig1.png
- Remember that the only part of this kit that is essential are the wands, consider how they visually appear in this tableau?
- After solving the grid, look at all the long skinny boxes – the 1x3, 1x4, 1x5, etc... these are boxes that contain the wands.
- You are told that each wand has “a white tips on both ends.” What significance does this carry?
- The extract letters are the ends of the wands, but the wands must be ordered by size of the wand.
- What if you read the first end of each wand and then read the second end?
- PARTIAL SOLUTION: https://puzzledhint.com/JUN2026fig2.png
- READY AIM FIRE
Cups
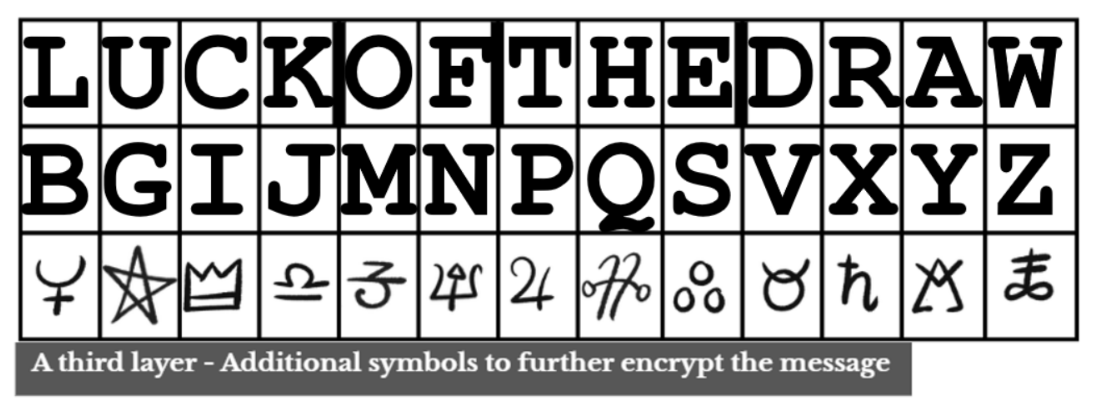
- The scrap with RELIEF written on it tells you that R=X, E=S, L=B... So in the ‘Workspace’ above the R, write X and above the X, write R; above the E, write Sand above the S, write E...
- The keyphrase is comprised of four words, and you should be able to discern which letters (not necessarily consecutive) in the top row of the workspace are part of this phrase.
- The middle words are "OF THE".
- PARTIAL SOLUTION: The keyphrase (top row) reads "LUCK OF THE DRAW" The rest of the letters in the alphabet give the cipher: https://puzzledhint.com/JUN2026fig3.png
- How could we use the symbols in the third row? In the Note attached to Hersilia’s chest, why do some of these symbols look different.
- The upright symbols correspond to the top row letters, the inverted symbols correspond to bottom row letters.
- STING OPERATION.
Swords
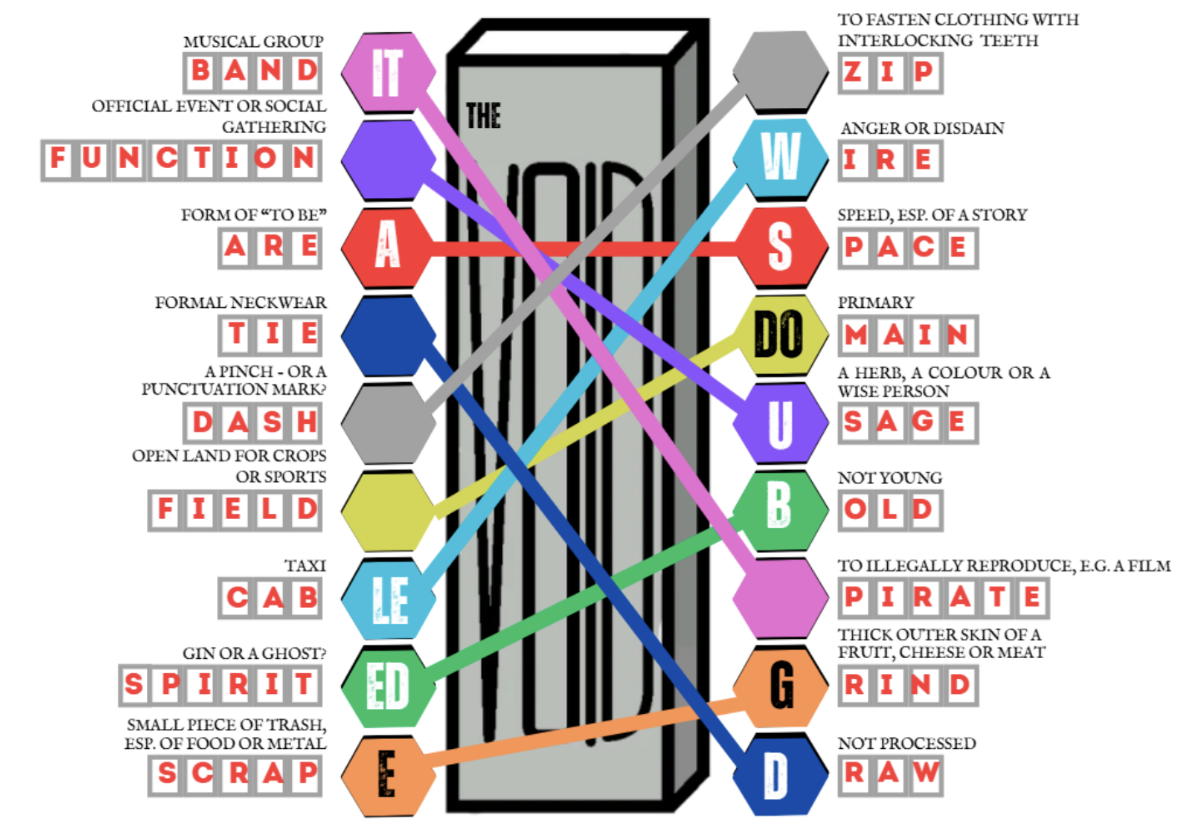
- PARTIAL SOLUTION: The code words
LEFT SIDE: BAND, FUNCTION, ARE, TIE, DASH, FIELD, CAB, SPIRIT, SCRAP;
RIGHT SIDE: ZIP, IRE, PACE, MAIN, SAGE, OLD, PIRATE, RIND, RAW;
- With our code words in place, we need to start putting in the swords. Remember, each blade needs to be inserted in the left to poke out the right. The letters will alter the input codewords to be synonymous.
- For example, if we add IT to the end of BAND, we get BANDIT, which matches up with the similar meaning code word TO ILLEGALLY REPRODUCE, EG A FILM: PIRATE
- PARTIAL SOLUTION: https://puzzledhint.com/JUN2026fig4.png
- With the swords inserted correctly, the letters on the gems can be read off left-to-right top-to-bottom.
- IT WAS DOUBLE EDGED
META – The Star
- Do not cut out the cards... yet. The first step is interpreting the stars. What might they have to do with our collected answers? And what does any of this have to do with playing card suits?
- The four suits of the minor arcana of a tarot deck have a corresponding suit in a French suit deck (ie clubs/spades/hearts/diamonds). Check the info panel in each main puzzle to match them. While you're at it, looking at the star signs might help.
- PARTIAL SOLUTION: CODE WORDS. The words in the boxes are as follows.
SPADES ---> SWORDS: "IT WAS DOUBLE EDGED" -------------> The Twins --> GEMINI
CLUBS ----> WANDS: "READY AIM FIRE" -------------------> The Archer -> SAGITTARIUS
HEARTS ---> CUPS: "STING OPERATION" -------------------> The Scorpion -> SCORPIO
DIAMONDS -> PENTACLES: "THUS SHE BECAME A MATERIAL GIRL" --> The Maiden -> VIRGO
- Next let's add some letters, keep in mind the suits and their index value.
- Use the values to index into the star signs – the first card is 3 of diamonds so index 3 into VIRGO = R. The second card is the 2 of spades so index 2 into GEMINI = E.
- PARTIAL SOLUTION: RESOLVING
- What do you think is meant by “we must further pig-ment the cards”?
- Write the pigpen symbols for each of the letters in RESOLVING. The middle one (L) has been done for you.
- NOW you can cut out the cards and figure how they fit into the array on page two using the four principles.
- A good place to start placing cards is the third principle. There is only one arrangement that works for all three cards and that works for the other principles.
- After that first step, the first principle tells you that where the other ace is, and by extension, where the other diamond must be.
- There are only three pairs of matching neighbours, and only one set of same-facing suits, use that to lock in the last few cards.
- PARTIAL SOLUTION The cards are distributed like so (S> SPADES, C> CLUBS, H> HEARTS, D> DIAMONDS)
JKR | 3H | AC
2S | 5S | AD
3C | 6H | 3D
- Now try reading the new pigpen symbols to get the second part of the answer.
- RESOLVING POTENTIAL.
BONUS - Clairvoyance
- If you haven't done so already, might be worth getting the Code Sheet out.
- Each card has some features that change from card to card. The edges and corners are cut, the stars shift, moon changes phase and new plants grow in the garden. Relate them to the different codes and start making some sense.
- The cuts in the corners and edges occur in six possible positions in a 2 x 3 grid. What code does that bring to mind?
- The constellations have stars numbering in the range of 1 to 26. What code might that correspond with?
- The “horns” of the moon in the different phases occur in positions around the circle that should remind you of another code.
- The roots form plants that either have little sticks on them or a ball. What code is based on two options?
- PARTIAL SOLUTION: Read in each style of code in order (BRAILLE - DECIMAL - SEMAPHORE - BINARY)
- PARTIAL SOLUTION: This gives the message: FINAL WORDS OF GUIDANCE. What do you think this is referring to?
- Read off the final word in each of the six Guidance statements.
- PARTIAL SOLUTION: These final words are FOLD / INWARD / FORM / LARGE / CIRCLES / TURNED.
- Your final instruction is to fold the image of the cards down until they form circles and turn the page upside down.
- COLD READING.